最近的感慨

1

上图是今天群里的某位大佬最近面试的吐槽,学生物、化学的都来抢程序员的饭碗了。来看一组数据:

104

上图出自《2020大学生就业力报告》,有四分之一应届生毕业后都想从事互联网行业,2020年应届生有800多万,就是200多万毕业后想要从事互联网,这比例远超其他行业了。

Read More

CSS实现光照效果

欢迎大家关注我的公众号【正义的程序猿】
大部分都是聊技术,偶尔会发点感概,生活总结。

先来看下效果:

60

可以看到,光标的位置像一个手电筒一样照着,这就是今天我们要实现的光照效果,主要代码如下:

1
2
3
4
5
6
7
8
9
10
11
12
13
14
<div class="box">
<div class="effect"></div>
<div class="item-list">
<div class="flex-row item-list-row">
<div class="flex-side flex-row item">
<div class="flex-side icon"></div>
<div class="flex-main">
<div class="name">系统</div>
<div class="desc">显示、声音、通知、电源</div>
</div>
</div>
</div>
</div>
</div>

CSS样式:

1
2
3
4
5
6
7
8
9
10
11
12
13
14
15
16
17
18
19
20
21
22
23
24
25
26
27
28
29
30
31
32
33
34
35
36
37
38
39
40
41
42
43
44
45
46
47
48
49
50
51
52
53
54
55
56
57
.flex-row {
display: -webkit-flex;
display: flex;
-webkit-flex-direction: row;
flex-direction: row;
}

.box {
position: relative;
display: inline-block;
color: #fff;
font-size: 20px;
background-color: #000;
--pt-x: 0;
--pt-y: 0;
}

.box .effect {
position: absolute;
top: 0;
bottom: 0;
left: 0;
right: 0;
background: radial-gradient(
circle at calc(var(--pt-x) * 1px) calc(var(--pt-y) * 1px),
#fff,
rgba(255, 255, 255, 0) 4em
);
z-index: 0;
}


.box .item-list {
z-index: 2;
}
.box .item-list .item {
position: relative;
margin: 1em;
padding: 1em;
line-height: 1.5em;
border: 2px solid rgba(255, 255, 255, 0.5);
background-color: rgba(0, 0, 0, 0.7);
background-clip: padding-box;
box-shadow: 0 0 0 1em #000;
}

.box .item-list .item .icon {
margin-right: 1em;
width: 1.5em;
height: 1.5em;
background-color: rgba(255, 255, 255, 0.5);
}

.box .item-list .item .desc {
color: #999;
font-size: 16px;
}

然后是几行javascript代码:

1
2
3
4
5
6
7
8
document.addEventListener("DOMContentLoaded", function () {
let domBox = document.querySelector(".box");
domBox.addEventListener("mousemove", function ($evt) {
let rect = domBox.getBoundingClientRect();
domBox.style.setProperty("--pt-x", $evt.pageX - rect.left);
domBox.style.setProperty("--pt-y", $evt.pageY - rect.top);
});
});

稍微讲解下原理,首先样式的效果主要是在<div class="effect"></div>这个标签上设置的,然后设置样式为absolute绝对定位,就相当于父级元素的蒙层,背景颜色是一个径向渐变,大概是这样:

1
2
3
4
5
6
7
8
.box-effect {
margin-top: 20px;
border: 1px solid black;
width: 310px;
height: 120px;
background: radial-gradient( #fff,
rgba(0, 0, 0, 1) 4em);
}

14413

javascript代码就是获取鼠标的位置,然后把上面径向渐变的中心点实时修改成鼠标的位置,大概就是这样:

14524

最后,调整CSS将光照涂层和另一个图层合并,效果就实现了,CSS调整大致就是z-indexposition和背景色rgba的设置,具体就不讲解了,原理大概就是这样了。


欢迎阅读本篇文章,如有兴趣可以关注博主公众号哦:

Vue slot使用总结

Vue.jsslot的意为“插槽”,我的理解是它为其他构件提供一个盛放它们的容器,用到的构件直接往这个容器里面放。非常的高内聚、低耦合,说人话就是,构件的样式、属性都是内部的,插槽定义的只是这个容器的样式和属性,构件的修改不会影响到外部的插槽,真的很模块化。

组件

插槽的使用是在组件的基础上的,我们先定义一个简单的组件:

1
2
3
4
5
6
7
8
9
10
11
12
13
14
15
16
17
18
19
20
// component.vue
<template>
<div class="card">
<h2 class="title">标题</h2>
<div class="content">
这是内容
</div>
<div class="footer">
<button class="cancel">取消</button>
<button class="confirm">确认</button>
</div>
</div>
</template>

// app.vue
<template>
<div id="app">
<card></card>
</div>
</template>

渲染出来的效果:

流程图:

graph TD;
	A-->B;
	A-->D;
	B-->C;

时序图:

sequenceDiagram
    Alice->>John: Hello John, how are you?
    John-->>Alice: Great!

状态图:


插槽

插槽需要在组件中使用slot标签定义:

1
2
3
4
5
6
7
8
9
10
11
12
13
14
15
// component.vue
<template>
<div class="card">
// ...
<div class="content">
<slot></slot>
</div>
// ...
</div>
</template>

// app.vue
<div id="app">
<card>这是slot内容</card>
</div>

使用的时候直接将内容放在组件的标签内,就当是一个普通的html标签,渲染时就会替换掉组件的<slot>部分:

<slot></slot>标签内也可以放入内容,作用是作为默认内容,比如:

1
2
3
4
5
6
7
8
9
10
11
12
13
14
15
16
17
18
19
20
// component.vue
<template>
<div class="card">
<h2 class="title">标题</h2>
<div class="content">
<slot>这是默认内容</slot>
</div>
<div class="footer">
<button class="cancel">取消</button>
<button class="confirm">确认</button>
</div>
</div>
</template>

// app.vue
<template>
<div id="app">
<card></card>
</div>
</template>

具名插槽

就是有名字的插槽,作用时当组件中有多个插槽时便于区分,如果没有指定名称,默认就是default,父子组件中分别这么写:

1
2
3
4
5
6
7
8
9
10
11
12
13
14
15
16
17
18
19
20
21
22
23
24
25
26
27
28
// component.vue
<template>
<div class="card">
<h2 class="title">标题</h2>
<div class="content">
<slot></slot>
<div class="detail">
<slot name="detail"></slot>
</div>
</div>
<div class="footer">
<button class="cancel">取消</button>
<button class="confirm">确认</button>
</div>
</div>
</template>

// app.vue
<template>
<div id="app">
<card>
这是slot内容
<template v-slot:detail>
<p>这是详细内容</p>
</template>
</card>
</div>
</template>

渲染后:

可以看到,根据不同的插槽名称渲染进去,没指定名称就被渲染到default里面,

使用可以使代码更加独立和低耦合,

Big Sur the file can't be found

macOS 更新完Big Sur后,链接iOS后弹出“文件找不到”提示框,如下:

45

解决办法:

  • 打开图像捕捉程序

124

  • 在图像捕捉里选择你连接的iphone设备
  • 点击图像捕捉程序上方的那三个点
  • 选择其他
  • 在弹出来的框里选择应用程序为图像捕捉
  • 关闭图像捕捉
  • 拔掉iphone。然后再插上usb。

这时候会弹出图像捕捉的应用程序不会弹出找不到文件了。如果不想弹出图像捕捉,那么再打开图像捕捉。点击那三个点。选择不打开任何应用程序。

“The File can’t be found” when I plug in my iPhone on macOS Big Sur

Solution:

  • Open the Image Capture application
  • Click on the dots icon (left of trash can icon) and in the drop-down for ‘Connecting this iPhone opens:’ select ‘Other’
  • In the Finder navigator, select Image Capture
  • Close the Image Capture application (CMD-Q)
  • Try plugging the phone in again. It should launch Image Capture, and put up thumbnails of your photos.

If you don’t want that to happen. Try re-doing the drop down for what to do upon connection, and select ‘no application’.

参考:

  1. https://discussionschinese.apple.com/thread/252246908
  2. https://discussions.apple.com/thread/252046791

小程序中获取用户手机号

在使用小程序的时候,经常会遇到获取手机号的提示框,不给手机号就不让访问,比如下面这个:

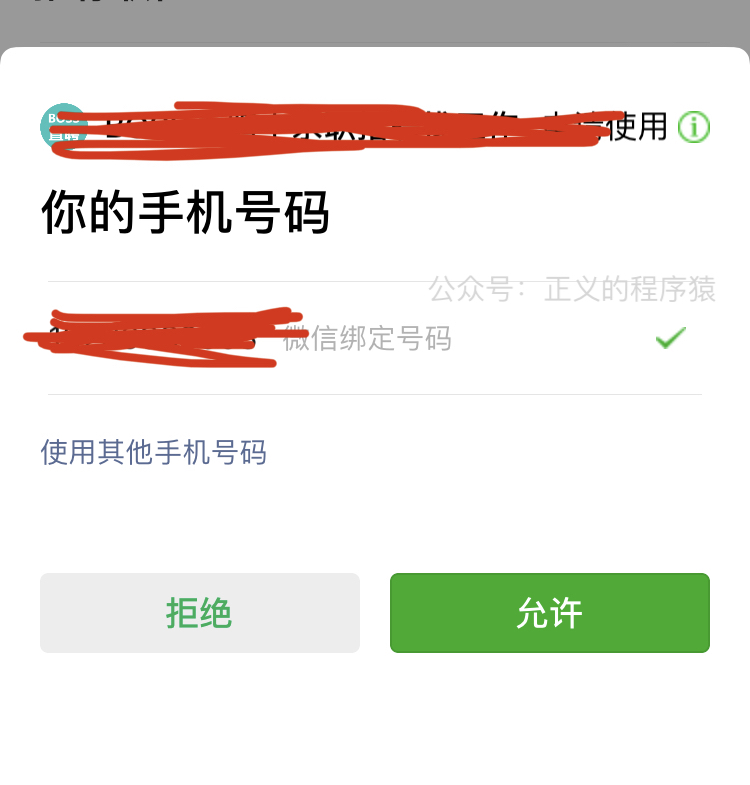
这种情况还经常发生在饭店点餐的时候,原先纸质的菜单直接被一个二维码取代,用户扫码后首先就要获取你的手机号你才能点餐。 不得不说小程序获取用户手机号是非常的便捷,今天这篇文章就来学习下小程序获取手机号的流程。

Read More